
A screenshot is one of the features of smartphone devices, computers, and tablets, that users consider almost on a daily basis. It is used to share information in the form of images. You can capture views of any apps using the option of ‘screenshot’ and save it in your local folder. Capturing screenshots is much easier and more convenient rather than opening notepads and taking notes every time you want to save messages and other credentials. In this blog article, we will get a detailed knowledge of the process to build an interface for screenshots, allowing users to take and share the saved screenshots.
So, with this tutorial guide focused on creating a functional screenshot interface, improve your expertise in React Native app development.
Getting started with the prior-needed tasks
- React Native environment– If you are starting new to the journey of web or app development and have chosen React Native as the appropriate framework, then you have to set up the environment. First, you must choose a particular OS. For this project, let’s consider Android and Windows. In regard to this, we have to download Node, JDK, Android Studio, Visual code editor, and React Native CLI. Note that the setup process will not be the same as that of the Android platform.
Also, you can select a different React Native tool, which is the Expo CLI. Before setting up the environment, note down the software you are comfortable working with. This is the step as followed by the developers of React Native app development company.
- A simple template for the interface– You need a container-like structure, which we are referring to as a template. To build this template folder, open a terminal from any folder you want to store your project.
Run npx react-native init ScreenShot-app –version 0.71.3. Your template folder will be built with the name (Screenshot-app). Also, we are using the current version of React Native, i.e., the 0.71.3.
With the given command, you can get all the basic folders that a React Native project needs along with the App.js folder. It is the main folder in which you will create the codebase.
- Third-party plugin installation– This is the step focusing on installing third-party plugins. For this project, we need react-native-share and react-native-view-shot. We will use the npm commands to install both the library. To use this library, you need to import relevant components from these libraries. Later, in the codebase, you learn the procedure of importing ViewShot from react-native-view-shot and Share component from react-native-share. Both components will be useful for capturing and sharing screenshots through other applications.
To build the codebase in the App.js folder
Let’s get the code snippets from the project and explain the use of different components, event handler, functions, and methods in this project.

Image 1
The code snippet shown in image 1 imports the components from different libraries. It also imports two hooks namely useRef and useState.
useState is used to introduce a state variable and make updates in the state of these variables.
ViewShot and Share are the third-party components taken from the react-native-view-shot and react-native-share respectively. Here, the ViewShot component is used to take a screenshot of the user interface. Finally, the Share component is used to share the screenshot with other apps.

Image 2
This code creates a React component App. It uses the useRef and useState hooks to store a reference to a View component and an image.
In this code snippet, const [image,setImage]=useState() declares a state variable image. It has another function setImage that is used to update its value. The initial value of the image variable is undefined. You can notice from the snippet that no initial value is provided as an argument to the useState function.
The TakeScreenshot function is triggered when the user presses the Button. It uses the ref to capture the View element and stores the result in the image state.
Finally, it displays the image if it exists.

Image 3
This code defines a function ShareImage. The function will open a window that will allow users to share the captured image and message.
The image and message are specified in the ‘option’ object.
The url property has the value of the state varibel (image).
The message property has the string “products Details” as its value. This string can be used as a message or title to describe the product that is displayed alongwith the image.
The Share.open() method is then triggered. It has the ‘option’ object used as an argument. It will direct the users to the sharing window.
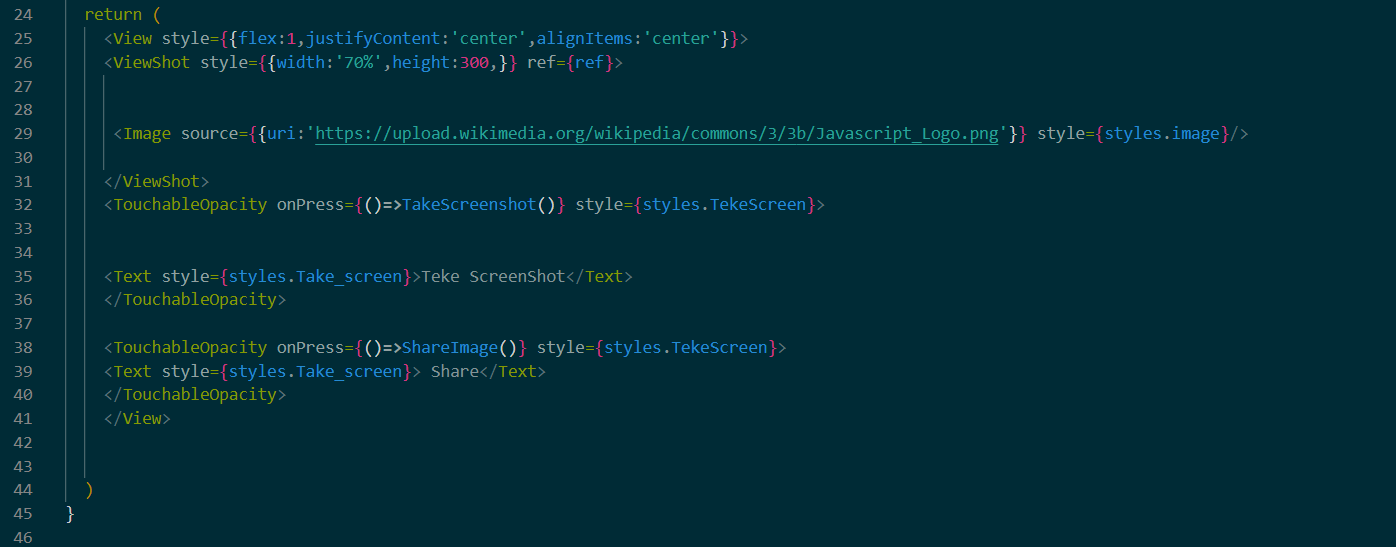
Image 4
This code creates a View component with a style of flex:1, justifyContent:’center’, and alignItems:’center’.
Inside the View component, the code snippet has a ViewShot component. It has a width of 70% and a height of 300 pixels.
There is an Image component embedded in the ViewShot component. It has a source of a Javascript logo.
Also there are two TouchableOpacity components. The components are added inside the ViewShot component.
The first TouchableOpacity component has an onPress function. It activates the TakeScreenshot() function. The following TouchableOpacity component has another onPress function that calls the ShareImage() function.
Both TouchableOpacity components have a Text component added to them. It has a style of Take_screen.

Image 5
The code snippet in image 5 creates a style sheet for the React Native app.
The export default App exports the App component from the file.
The StyleSheet.create() creates a styles object with three style objects, image and Take_Screen and TekeScreen.
The image style object sets the width and height of an image to 100% and 300 pixels respectively.
The TekeScreen object sets the width as 150 pixels, height as 35 pixels, background color as #CD5808, border radius as 10 pixels, justify content as center, align items as center, and margin vertical as 10 pixels.
The Take_screen object sets the color of the Text component to white.
To check the accuracy of the program
In this step, you should consider two commands. The first one is the npm install and the other one is the npx react-native run-android. Run both these command on your project terminal and wait for some time till the program runs on the emulator.
Refer to image 6 for the final output.

Also Read: Seamless Customer Experience: Enhancing Service Delivery with Workshop Management Software
Image 6
If you are into front-end development, React Native is the most effective framework to start with. It is a robust framework notonly in ters ofperfomance but also in terms of usability. So, open your code editor and start building the interface now.